Infrared flash camera trap photography of a thylacine taxidermy
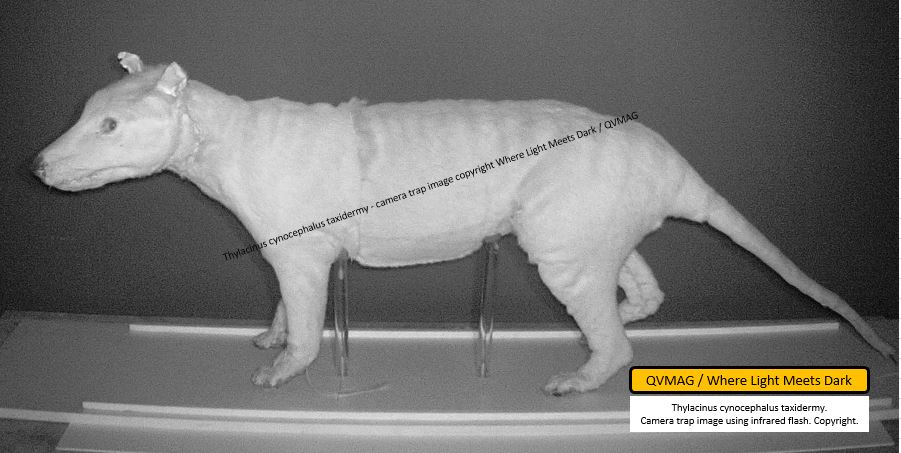
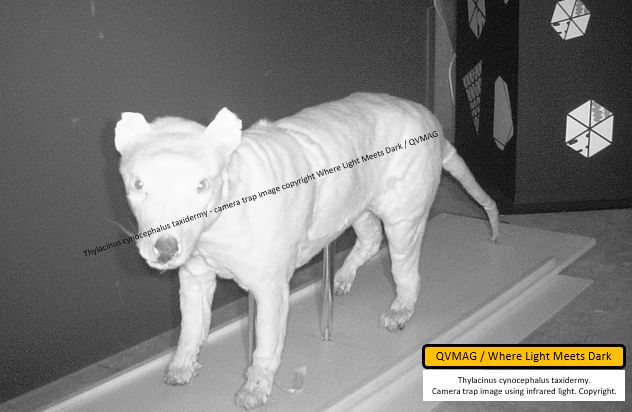
Photo 8 - Photograph of Thylacine taxidermy using infrared flash
Abstract
An investigation was undertaken into the visual appearance of Tasmanian tiger stripes (Thylacinus cynocephalus, also known as thylacine) when photographed using a camera trap (also called trail camera) configured to utilise an infrared flash. The study is limited to one model of camera and evaluates both stills photography and motion video. On the basis of black and white visible-light film footage captured by David Fleay in the 1930s it was hypothesised that the angle of viewing the thylacine would affect stripe visibility. A taxidermied mount was photographed at Queen Victoria Museum and Art Gallery in Launceston, Tasmania. Stripes were visible in some images (photos and video) and not in others. This study showed that neither viewing angle nor imaging format (video versus still photo) affects stripe visibility. Rather, ambient light intensity, distance of the animal from the camera and camera flash intensity are factors that affect stripe visibility with ambient light having the greatest impact and distance to camera and flash intensity affecting the risk of overexposure. Anecdotal evidence suggests that camera model choice can affect the likelihood of overexposure and thus stripe visibility. In summary, a thylacine's stripes can be visible using infrared flash photography and moreso as ambient light increases, but an absence of stripes does not imply that a given animal is not a thylacine.
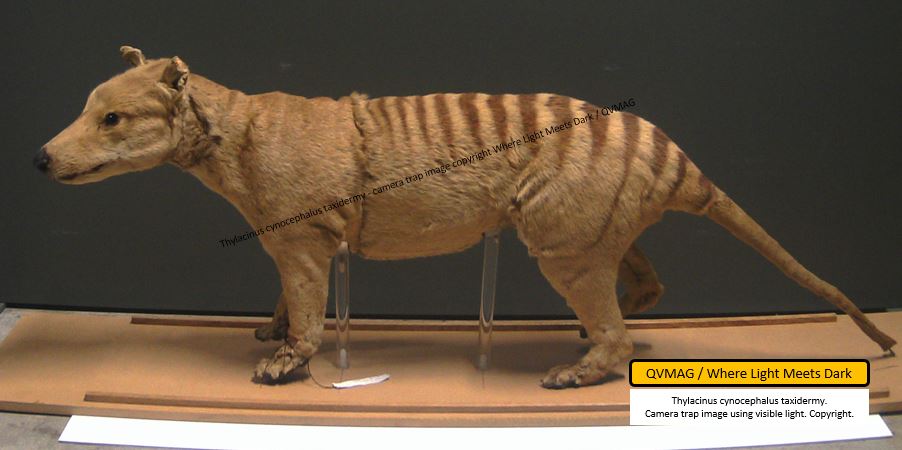
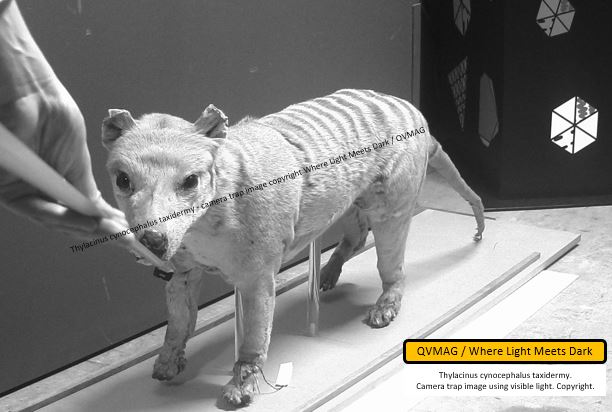
Photo 4 - Photograph of Thylacine taxidermy using visible light
Overview
Despite immeasurable camera trapping efforts within Tasmania by numerous people and organisations and for many reasons, no definitive camera trap image of the Tasmanian tiger has appeared. This is of course, unsurprising, as presently the thylacine's accepted extinction is dated to 1936. Despite this, many people are dedicated to deploying camera traps in the hope of proving the species is extant and many others utilise camera traps in the research of other species which might, if the thylacine is extant, capture a thylacine also.
There are many criticisms of the images and videos captured by typical camera traps (meaning commercial passive infrared detection cameras, as opposed to "home brew" SLR camera traps). These include:
- the resolution of images may be so low that few pixels are dedicated to representing the subject animal, especially if it is distant, resulting in very little visible detail;
- night time images utilising infrared flash are rendered in greyscale, again limiting the detail captured;
- infrared flash may be so brightly reflected off animals that are near the camera that the animal is rendered completely overexposed and, again, little detail is discernible other than an outline;
- infrared flash may be so weak that distant animals are not well illuminated, again reducing the visible detail;
- shutter speeds may be so slow (typically to account for the low light conditions) that a moving animal may render as a blur, again reducing the detail available;
- trigger response times may be so slow that an animal passes by the camera's field of view - either completely, or at best partially - resulting in a missed opportunity to capture the animal, or only part of the animal captured.
Given these limitations in the quality of camera trap images, it can be extremely difficult to identify an animal to the species level, especially when the animal is photographed with infrared flash. Further, given that photographs taken using infrared flash are a greyscale rendering of infrared light - which is not normally visible to the human eye - the grey tones in an infrared image may not bear "expected" correlation to the visible light colours we would normally see. This last point, in particular, means we cannot be certain that markings which are high contrast when viewed with visible light, will necessarily show the same level of contrast when rendered as a greyscale image utilising infrared light.
In that context, this study was undertaken to photograph and film a thylacine taxidermy utilising infrared flash photography provided by a typical commercial camera trap. The primary goal was to investigate how the thylacine's stripe pattern is rendered using infrared flash photography.
The taxidermy - Frankentiger
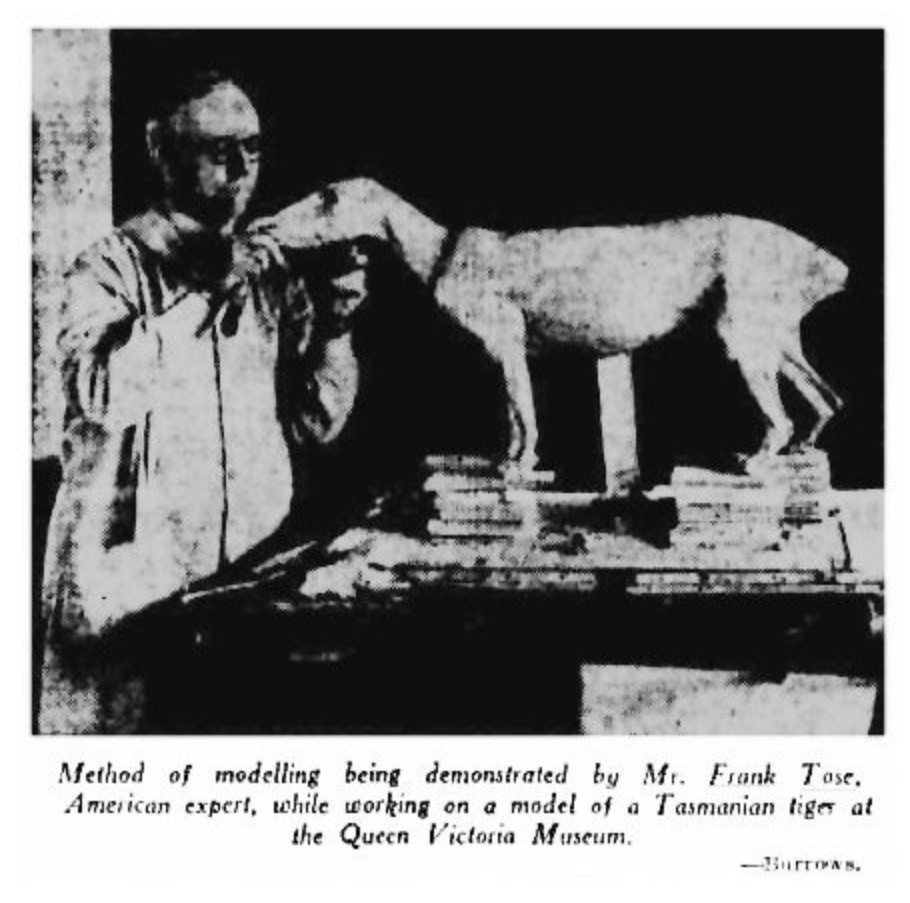
The taxidermy used in this study is catalogued by the Queen Victoria Museum and Art Gallery (QVMAG) as [OLD:1:2005 1.2]. "Frankentiger" is the endearing name affectionately given to it by some researchers, after the fictional scientist Victor Frankenstein, who is known in Mary Shelley's novel for creating a creature from component parts, as this museum specimen has been compiled from the component parts of two separate animals. Frankentiger was prepared in 1937 by American taxidermy specialist Frank Tose (Sleightholme, personal communication, 31 Dec 2017).
Taxidermist, Frank Tose - preparing the plaster form to be used in the construction of [OLD:1:2005 1.2] - "Frankentiger". Source: The Examiner, 7 Aug 1937. Credit: Burrows.
Project aims
A key goal in this project was to produce photographs of the taxidermy from a variety of angles - simulating the reality of the random nature in which animals appear in front of a camera trap in the wild.
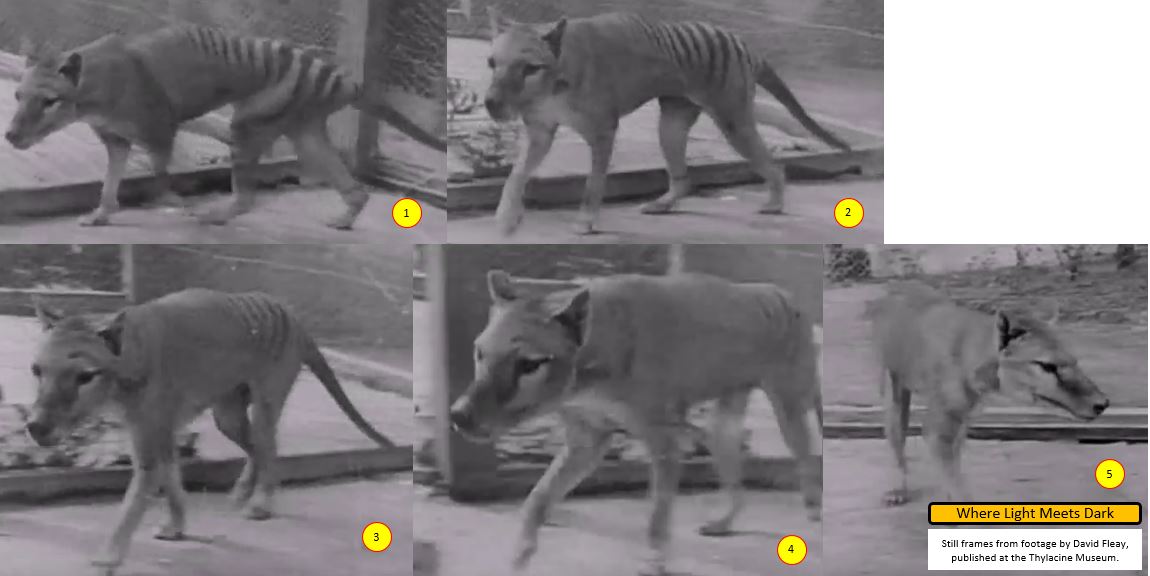
Further, in some of the historical footage of the thylacine filmed by David Fleay, there are some angles from which the animal's stripes disappear from view, as it turns about in its cage.
Still frames from footage by David Fleay - showing stripe pattern disappearing at certain angles. Footage published at: The Thylacine Museum. Composite: WLMD.
The five frames presented above demonstrate this effect. Frames 1 to 4 are given in sequence. The first two frames show the bold stripe pattern. In frame 3, as the animal turns toward camera, the number of visible stripes is reduced because the anterior stripes have disappeared from view. In frame 4 the stripes are almost totally imperceptible. Frame 5 comes from later in the same sequence and here the stripes are imperceptible on the other side of the animal as it takes a similar angle toward camera as seen in frame 4.
Without access to view the physical film frame by frame, this study is limited to reviewing the digitised and likely compressed versions that are publicly available. Although artefacts can be introduced to the footage via the digitisation process (cf. analysis of the Doyle footage), it is possible that this disappearance of stripes may be observable in life due to, for example, darker fur being shorter than paler fur.
One key question in this study is whether the same effect occurs using infrared flash photography when the taxidermy is viewed at comparable angles.
Methodology
Camera models and configurations
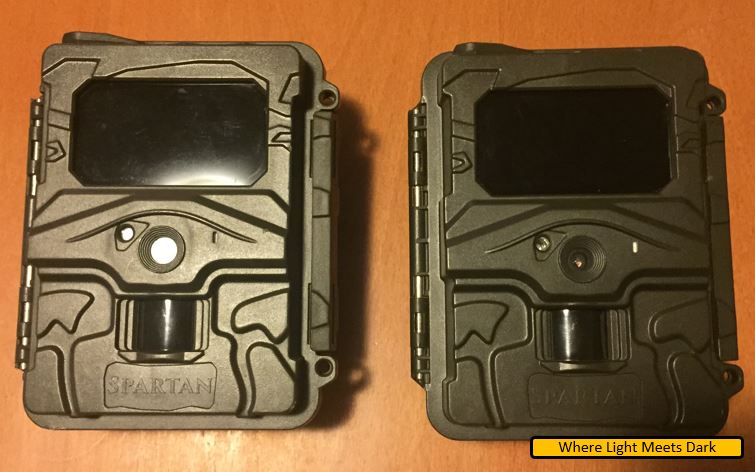
The Spartan camera traps used in the study.
Two Spartan SR1-IR camera traps were pre-configured as follows:
| Setting | Photo camera | Video camera |
|---|---|---|
| Activity on trigger | Still photos | Video |
| Qty / Duration | 2 photos | 8 seconds |
| Resolution | 5 megapixels | 720P (1280x720) |
| Flash power | Low | Low |
A low flash power was chosen to reduce the likelihood of flash reflecting off the taxidermy and overexposing the images due to the relatively close confines of the space available at QVMAG.
Camera positioning
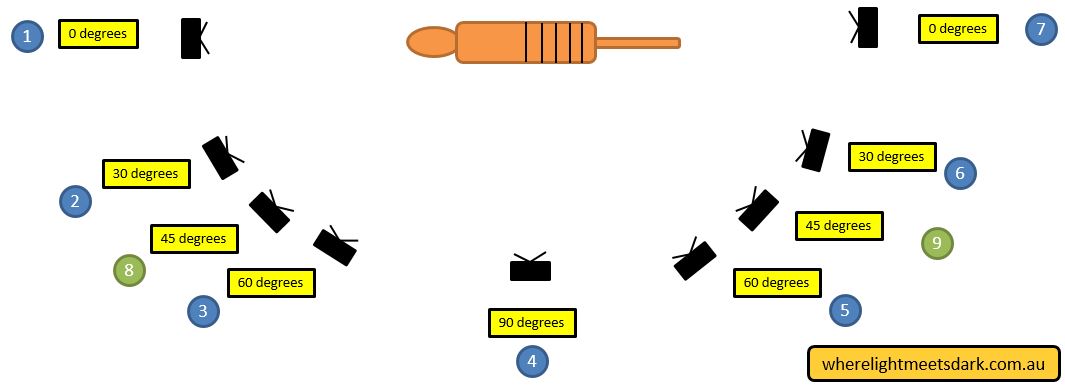
The cameras were shipped to QVMAG with an instruction sheet requesting, depending on staff time availability, that the cameras be placed at a variety of angles with respect to, and distances from, the taxidermy. The angles included front on, side on, from behind, and a mixture of approximately 30, 45 or 60 degrees off the side-on position on either side. Distances included 1, 3, 5 and 7 metres.
Illustration showing requested angles of capture.
Angles of view and distances
A visiting researcher with camera trapping experience assisted the Museum with the study. The confines of the space limited the angles and distances at which the cameras could be placed and exact distances were not recorded against individual images captured. The angle of view can be inferred from the imagery itself. Initial photos were taken in close proximity to the taxidermy, from a variety of angles. Subsequently, photos were taken at greater distance, but only side-on to the taxidermy.
Ambient lighting conditions
Staff were requested to capture imagery with lights on and lights off. The images captured with lights on produced visible-light colour photographs and video footage. These provide direct comparisons with those images captured utilising infrared flash while the lights were off.
The state of ambient lighting at the time of each trigger was not recorded. While inferences can be made about the ambient lighting at the time of capture, there are some considerations with this, discussed in the results below. In summary, some captures were made with lights on and produced colour imagery; some captures may have been made with lights on and produced infrared imagery; and some captures were made with lights off and produced infrared imagery.
Technical issues, data loss and recovery
The Museum advised that after completing a set of captures, the Photo camera exhibited a data read error on attempting to view the images. For this reason the researcher formatted the memory card in that camera. However after this point, that camera failed to trigger.
On the return of this camera to the author, it was noted that the camera's sensitivity setting was set to 'Off', thus disabling the camera. The cause of this misconfiguration is unknown.
Despite this issue, one of the video clips shows the taxidermy being momentarily lit more brightly, twice, at the start of the clip (video 32, below). This implied that the photo camera had fired and lit its flash twice - an event the video camera recorded. Given this confirmation that the photo camera had triggered at some point, an attempt was made to retrieve files from the formatted memory card.
The application EaseUS Data Recovery Wizard for Windows was used to scan the memory card and 129 images were recovered. Some of these have read issues and cannot be fully rendered but many have been successfully recovered without issue.
Video 32 - showing bright flashes at the start of the clip due to the photo camera firing its flash.
Results
Imagery captured
The project yielded the following imagery:
- 129 still photos (some with data corruption)
- 74 videos
Deducing ambient lighting conditions
Ambient lighting conditions cannot be reliably inferred for some of the imagery. Whilst it can be inferred to a degree (eg. black and white imagery implies that infrared flash was used, which implies lighting conditions were low), there are some considerations: one video clip commences with lights off and shows the researcher switching on the room lights. Because the video commenced with infrared flash, it completed the entire clip with infrared flash even though the room lights came on midway through the clip.
Video 44 - showing barely perceptible stripes at the start, then strongly contrasting stripes once the room lights are switched on.
This video reveals that under the initial low ambient lighting conditions (with lights off) that the thylacine's stripes are barely perceptible with the camera's settings at that time and at that distance. Once the ambient light increases (when the researcher switches on the room light), the stripes become very visible - even though the camera is still recording infrared light. This suggests that a thylacine's stripes show more contrast under bright ambient light conditions.
From this we may infer the lighting conditions that might have been visible during the stills photography. However, some stills show marked contrast in the taxidermy's stripes - implying bright ambient lighting conditions - but when the camera has captured these photos using infrared flash - implying low light conditions.
Photo 16 - showing good fur detail and contrasting stripes, comparable to the end of video 44 which utilised infrared flash while ambient light was bright.
Photo 19 - showing almost no fur detail and no visible stripes, comparable to the start of video 44 which utilised infrared flash while ambient light was dim or near absent.
In photo 16, above, the taxidermy is rendered as clearly as would be expected of a back and white film or digital photograph utilising visible light. However, the camera trap renders greyscale images only when it is utilising the infrared flash and sensing infrared light. This suggests that the ambient lighting was low enough (at the camera's sensor) to trigger the "night time" mode on the camera (which uses infrared flash) yet bright enough to illuminate the taxidermy sufficiently such that good detail was captured. In brief, the camera utilised infrared flash despite relatively bright ambient light.
Photo 19, above, provides a contrast with photo 16 in that the fur detail and stripes which are seen in photo 16, are absent in photo 19. Note also that in photo 16 the researcher is holding a tape measure to the taxidermy - an act much more likely carried out with the room lights on. Note also the "noise" (or graininess) visible on the wall to the side of the taxidermy, and on the decorated column at rear, in photo 19 as compared with photo 16. Under visible light conditions, noise derives from using a highly sensitive film, or digital sensor setting, in the camera. As camera traps are programmed to select the best combination of settings for the available conditions, this graininess also implies that there was far less ambient light during the capture of photo 19.
Although we cannot be certain of the ambient lighting conditions in all cases, we can make educated deductions about probable lighting conditions. More importantly, it is clear from video 44 at least, that ambient light does affect the visibility of thylacine stripes with low ambient light less likely to render the thylacine's stripes (all other things being equal).
Visibility of thylacine stripes using infrared flash photography
At a high level it can be said that in some imagery captured using infrared flash, the thylacine's stripes are clearly visible (cf photo 16, above). In other imagery, the stripes are barely, or not visible at all (cf photo 19). In other imagery the stripes are faintly visible (cf start of video 44).
The key variables affecting thylacine stripe visibility appear to be:
- Ambient lighting conditions
- Distance of taxidermy from camera
- Camera flash intensity
Variables that do not appear to affect thylacine stripe visibility appear to be:
- Viewing angle
- Choice of video versus stills photography
The visiting researcher noted that "some camera models also have adjusted IR exposure, that appears to change intensity relatively well depending on conditions. For example, in an enclosed camera trap designs (camera placed inside a box) to capture small mammals, I have not experienced over exposure on sugar glider heads despite the camera being 20cm away from the animal. It can pick up the head stripe pattern."
Given this report of a different camera model successfully rendering the stripe pattern on a sugar glider at a distance of 20cm, camera model choice may also be a factor affecting stripe visibility. However ambient lighting conditions during the glider research are unknown and as described below, this may significantly impact the visibility of stripes.
Ambient light affecting thylacine stripe visibility
In the discussion above concerning deducing the ambient lighting conditions, it was seen that for fixed distance, viewing angle, flash intensity and camera choice, the visibility of stripes did vary based on varying the ambient lighting conditions. Stripes are more visible under brighter ambient light than they are under low or zero ambient light.
Distance to camera affecting thylacine stripe visibility
In order to illustrate the effect of distance to camera on thylacine stripe visibility it is ideal to have a set of photos where all other variables (ambient light, camera selection, flash intensity and viewing angle) are constant but the distance to camera is varied. This study did not produce a clear set of images meeting these criteria.
Further, ambient lighting conditions were not recorded, so consistency cannot be guaranteed between given images. Finally, the researcher, noting that many of the initial images were overexposed, made attempts to reduce the flash intensity by obstructing a portion of the camera's flash unit using cardboard. The camera's flash consists of an array of several rows of light emitting diodes which are obscured from our view behind a dark plastic panel (visible at the top of each camera in the photograph above). It is not known in which photos the full array of flash LEDs were employed and in which photos some LEDs were obscured. (Based on the author's experience with both commercial photography and camera trapping, it is not believed that the differences between photos 16 and 19, used to illustrate the effects of ambient light, discussed earlier, are due to reduction in flash intensity).
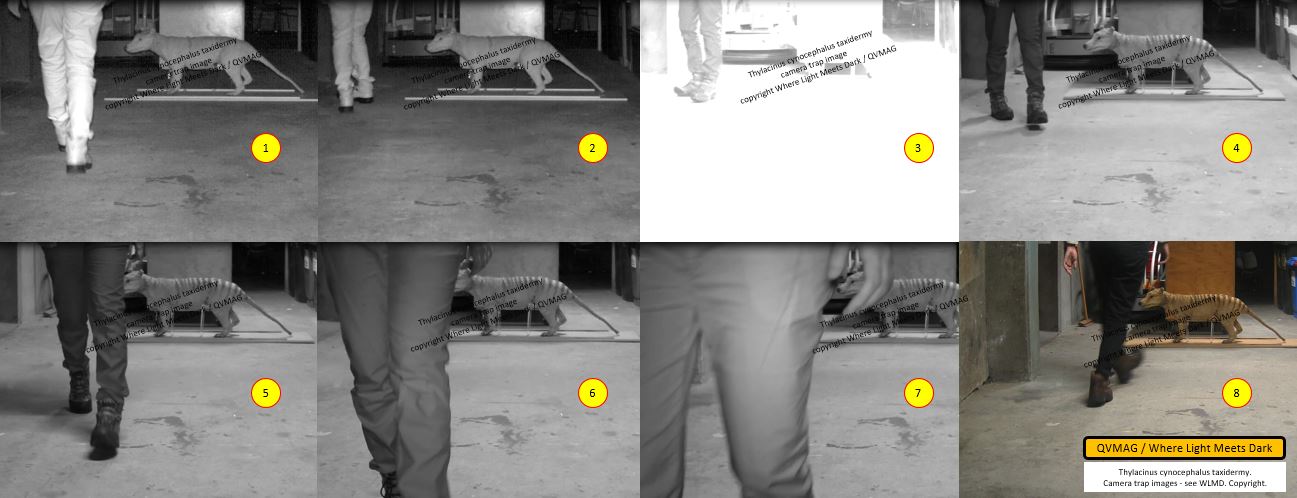
Despite these limitations, some deductions can still be made about the effect of distance to camera. Of particular note is video 44, shown above. Still frames from this clip are reproduced below.
Still frames from video 44 (frames 1 - 7) and photo 40 (frame 8)
It is actually the researcher in these frames - whose distance to camera varies - that is of note, and not the thylacine.
Frames 1 through 7 are presented sequentially. In frame 1 the researcher is walking away from the camera. In frame 2 the researcher is most distant from the camera. Note that the researcher's pants are brighter in frame 1 than 2 - that is, the brightness reduces with distance. In frame 3 the researcher has switched on the light. For a brief moment almost the entire frame is washed out by the bright light. On watching the video clip itself you can see that the camera adjusts to this change in lighting and reduces the exposure so that by frame 4, all features within the frame are again correctly exposed.
Note that in frame 4, the researcher's pants are one of the darkest elements in view, whereas in frames 1 and 2 the researcher's pants are one of the brightest. The difference in brightness of the pants is quite striking between these two frames. In frame 5 the researcher is walking toward the camera. In frame 6 the researcher is very near the camera; note that the pants in frame 6 are not as dark as in frame 5. Further, in frame 7 - closer to the camera - the pants are lighter again. Finally, frame 8 shows photo 40 and is not a still frame from the video. It is included to illustrate that under visible light conditions, the researcher's pants are a dark colouration, near black.
Interpreting video 44 - rendering infrared flash imagery
How are we to interpret the varying "colouration" (greyscale tone) of the pants within this single clip?
What we know are that frames 1 and 2 are illuminated solely, or almost solely, via the infrared light of the camera's flash unit. Between these two frames we see that with an increase in distance, the brightness of the pants reduces.
Frame 3 is relatively irrelevant to the discussion as it is an anomaly as the camera adjusts itself to the vastly different lighting conditions after the researcher switches on the lights.
In frame 4 we see that the rendering of the pants is closer to what we would expect, given our understanding from frame 8 that they are dark. Notably, this is true also of the thylacine's stripes from frame 4 onward.
In frame 5 the researcher's leading leg is brighter than the following leg but in frame 6 this is not the case. In frames 6 and 7 the pants are brighter than in frames 4 and 5, despite the lighting conditions remaining the same - it is only the distance to camera that varies. Why should this be so? This author speculates that in frames 6 and 7, because the researcher is nearer the camera, the camera's flash (which is reflecting off the pants) is being received by the camera and leading to the pants' brighter appearance. That is, the flash is bouncing back off the pants and this effect is most noticeable close to the camera. This may be the case in frame 5, accounting for the different leg brightnesses, or it may be the case that in frame 5, ambient light has the greater influence on the rendered image and the trailing leg is in shadow. Referring back to photos 16 and 19, note that in photo 16 - which we deduce was captured with bright ambient light - there are shadows cast by the thylacine on the floor. In photo 19 such shadows are absent.
We already know that ambient light affects the rendering of camera trap images captured utilising infrared flash, therefore we must consider frames 4 through 7 as one set, and frames 1 and 2 as a second set. We see from frames 1 and 2 that as distance increases, "brightness" decreases. We see from frames 4 through 7 that at distances relatively near the camera, as distance decreases, brightness increases due, it is speculated, to the camera's own flash bouncing off the subject.
We have also seen that the brightness of a subject (the pants, being bright, in frames 1 and 2) can appear unrelated to how we would expect a traditional black and white photograph to render it (given, in this case, the pants are in fact near-black). This serves to emphasise the fact that when a camera trap is utilising infrared flash, it is (as expected) detecting infrared light - which is typically not visible to the human eye and therefore doesn't necessarily have any relation to what we might expect to see. The later frames here illustrate that when ambient light is increased, this affects the rendering of the image such that it is nearer what we expect of traditional black and white photography.
Can we, however, extrapolate the effects seen on the researcher's pants, to draw conclusions about the thylacine? Firstly, the visible light colouration is different. Even though infrared rendering is not necessarily what we expect based on visible light observation, there may still be a correlation. In frames 1 and 2 the sole of the boots renders as near-black while the boot upper, and pants, render near-white. Under visible light conditions (frame 8), all three are dark. It seems more reasonable that it is the material of the subject (likely being rubber, for the boot sole) which affects the brightness of the rendering under infrared conditions (with low ambient light) and this makes sense - the camera is detecting reflected infrared light; if the flash's infrared light is absorbed by the subject, then it is not reflected and therefore not detected, rendering as dark.
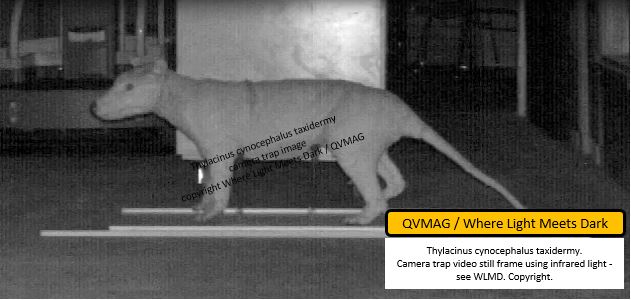
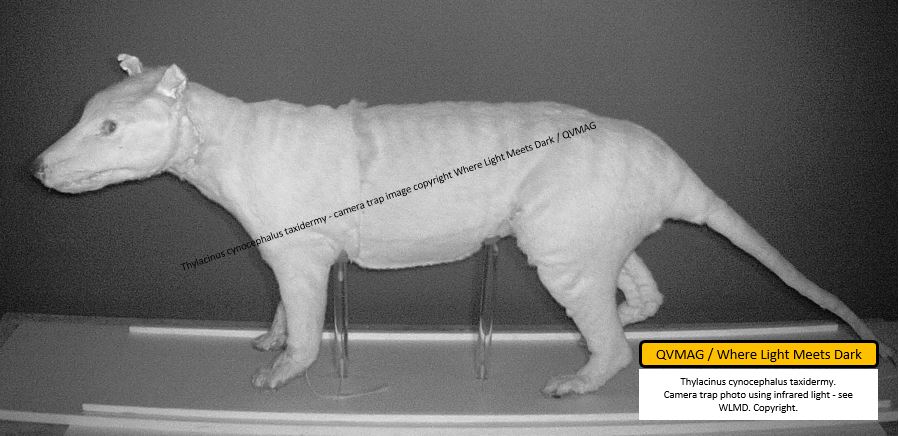
In the case of the thylacine we shall see from an enlargement of frame 1 (below), and photo 71 (below, or the similar photo 8, at top of article), that the stripe pattern is only barely perceptible even when the taxidermy is brought nearer the camera (bearing in mind not all other variables are constant between these two images).
Still frame from video 44 - captured at a distance, showing barely perceptible stripes
Photo 71 - captured nearer the thylacine, showing better, but still barely perceptible stripes
The "boldness" of the stripes does not appear to have changed between the still frame from video 44, which was captured at a distance, and photo 71, which was captured much nearer the taxidermy. Rather, if the stripe pattern is more perceptible at the nearer distance it seems likely due to the greater number of pixels used for rendering the thylacine when it is nearer the camera. It must be remembered that in the first image here, video rendering was used, whereas the second is a still photograph and we cannot confirm that ambient lighting was identical between frames.
Conclusion regarding distance to camera
Measuring the effect of distance on stripe visibility has not been strictly controlled. In this context it seems likely that distance to camera can affect stripe visibility in the following ways:
- In general, under low ambient light conditions, the stripes are barely perceptible regardless of distance to camera;
- Increasing distance from camera is likely to reduce the brightness of the rendering of a thylacine and reduce the number of available pixels, each of which may reduce the visibility of stripes; and
- It seems likely (practically certain, based on the following section, for this camera model) that at very close range, stripes may not be visible at all - but this appears to be a function of overexposure due to the relatively higher flash intensity at such close distances (see section below).
Camera flash intensity affecting thylacine stripe visibility
In considering the effect of camera flash intensity on the visibility of thylacine stripes, we need to compare images in which all other variables are constant: ambient lighting, distance from camera and viewing angle.
Although the cameras provide the option to vary flash intensity (at the time of their programming), such variations were not requested for this study. The researcher made an attempt to vary flash intensity in an effort to reduce overexposure at some point during the study by blocking a portion of at least one of the camera's flashes - but it is not known at what point this step was carried out.
Despite this, videos 32 and 33 exhibit bright flashes which correlate to the photo camera triggering at that time (and lighting its flash). We saw from video 44 (cf. still frames, above) that when ambient lighting was switched on, the video camera took a moment to adjust to the change in ambient lighting. It is arguable that when the flashes are seen in videos 32 and 33, the video camera is prompted to adjust to the change in infrared lighting. The time taken to adjust, seen in video 44, is a second or two. The duration of each individual flash in videos 32 and 33 is shorter than 1 second. Therefore we cannot look to the videos to understand how the camera behaves when the flash intensity is doubled due to two cameras lighting the scene. However, we do know that when the photo camera was triggered at those points, the video camera was already running and contributing its flash to the scene. This means that at those points the photo camera captured images at twice the intensity of infrared flash than is the case when the video camera was not filming.
In order to identify the photos that correlate with the flashes seen in videos 32 and 33 a table of of events for each camera, and the timestamp visible in the image at time of those events, was constructed (not presented here).
The key points used to correlate camera times are:
- Photo 29 shows a hand holding a tape measure to the taxidermy at 11:32:52 (photo camera time)
- Video 31 commences at 11:33:20 (video camera time) with a hand holding a tape measure to the taxidermy. The hand then moves closer to the taxidermy, holds the tape measure in place, and rapidly retracts, four seconds later, at 11:33:24 (video camera time)
- It is deduced that the photo camera timestamp of 11:32:52 occurred during the video camera time period 11:33:20 to 11:33:24; that is the photo camera timestamp is between 28 and 32 seconds slower than the video camera timestamp
- By repeating this process for all photos and videos showing the taxidermy from this angle at about this time, it was concluded that the bright flash at the start of video 33 (11:34:00, video camera time) correlates with photo 31 (11:33:31, photo camera time); likewise the bright flash one second later in the video correlates to photo 32, captured one second later.
- In conclusion, the photo camera shows a timestamp 29 seconds behind the video camera.
- The first bright flash in video 32 (11:33:40, video camera time) correlates to photo 30 (11:33:11, photo camera time); however the second bright flash in video 32, one second later, has no corresponding photo - presumably the camera was unable to save that photo, possibly due to being occupied with writing out photo 30 to the memory card, or due to the unknown fault that led to some photos ultimately being corrupt and unreadable.
- Importantly, photos 33 (11:33:55) and 34 (one second later) should correlate to video timestamps 11:34:24 and 11:34:25, both of which fall between videos 33 and 34; that is, these photos were taken without the contribution of the video camera's flash.
- This means the flash intensity for photos 33 and 34 was half that for photos 30, 31 and 32, thus giving us our comparison images.
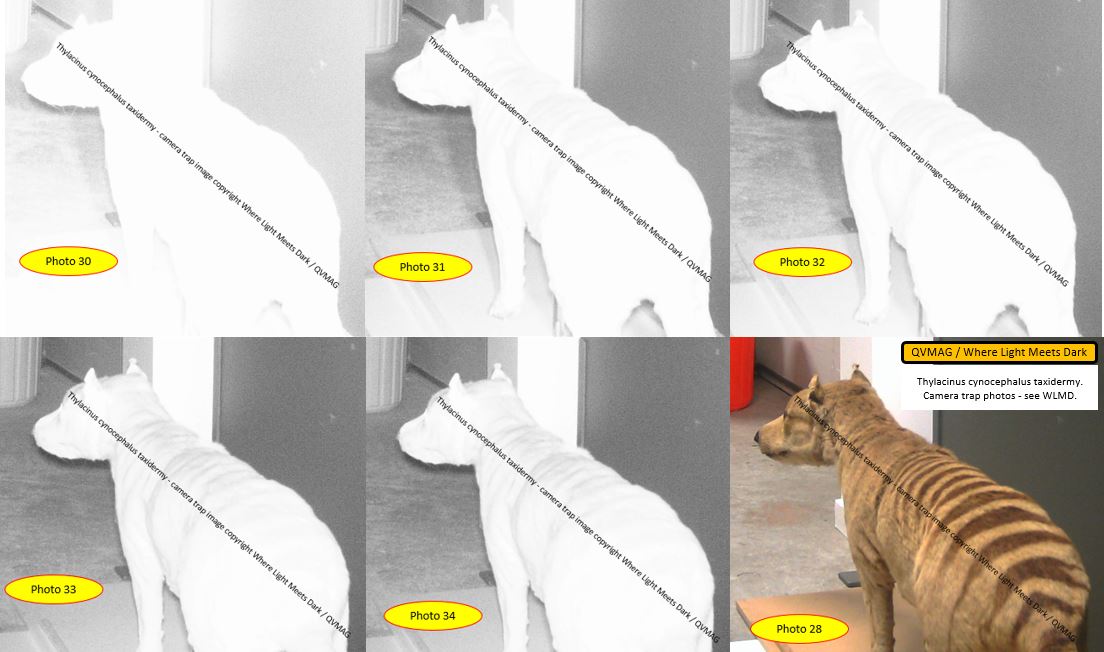
- Finally, photo 28 gives us a reference photograph using visible light.
Composite showing photos 28 and 30 to 34
Photos 30 - 32 were captured at twice the flash intensity of photos 33 and 34. Although all three images captured with twice the flash intensity are overexposed, there is some transverse banding visible across the neck and back, above the forelegs, in photos 31 and 32. By examining photo 28, the boldest of these bands correlates with a fold in the skin (or join between two skins) which is clearly visible in photo 4 at top of this article. The thylacine's stripe pattern properly occurs posterior to this line, as can be seen in photo 28. Photos 33 and 34 do show indications of horizontal striping posterior to this line. The transverse bands anterior to this line are seen, in photo 28, to be folds in the skin. The remainder of the anterior of the taxidermy is overexposed in photos 31 and 32 due to its close proximity to the cameras (or more specifically, their flashes).
In photos 33 and 34, transverse banding along the spine is more obvious. Posterior to the skin join, this banding correlates with the taxidermy's stripes, visible in photo 28. Anterior to the skin join, the banding correlates with folds in the skin.
Conclusion regarding flash intensity
Clearly, doubling the flash intensity has brightened the image. Due to the close proximity to the camera, this has led to overexposure throughout most of the taxidermy's rendering in photos 30, 31 and 32. Despite this, some stripes remained visible in spite of the fur between them being overexposed. This suggests that there is still contrast between the stripes and the fur between stripes, even when flash intensity is increased. It is the overexposure which has rendered the posterior stripes invisible and overexposure is likely to be a function of both flash intensity and distance to camera.
Conclusion
This study was restricted to testing one camera model - the Spartan SR1-BK.
In summary, a thylacine's stripes can be visible using infrared flash photography - particularly where there is additional ambient light. In very low ambient light conditions, stripes are barely perceptible.
Varying flash intensity does not appear to vary the contrast of the stripes. Increasing flash intensity risks overexposing the image which results in no stripes being shown.
Increased distance from camera reduces the brightness of the rendering and reduces the number of available pixels for rendering the thylacine; both of these reduce the likelihood of perceiving stripes. Animals very near the camera may produce an overexposed image due to flash reflecting off the animal, but this may depend on camera model.
The angle of viewing the animal does not appear to impact the visibility of stripes, with ambient lighting playing the greater role.
An absence of stripes does not imply a given animal is not a thylacine.
In low ambient light conditions, the issue of overexposure is likely to be a function of distance to camera and flash intensity. Camera model choice may also impact the incidence of overexposure.
In higher ambient light conditions, the cameras tested were less likely to exhibit overexposure.
The key implication for field studies is that increasing ambient light has the greatest effect in rendering detail, including stripes. In very low ambient light, stripes are visible, but barely perceptible, even at close distance.
Acknowledgements
The author would like to acknowledge Queen Victoria Museum and Art Gallery, Launceston, and the visiting researcher, for their contributions in the capture of camera trap imagery and access to the thylacine taxidermy and Brendan Kays for his assistance with video watermarking.
Citing this article
Rehberg, C. (2018). Infrared flash camera trap photography of a thylacine taxidermy, Accessed: date, http://www.wherelightmeetsdark.com.au.
Disclosure
The author runs a business selling camera traps at www.wildlifemonitoring.com.au.
All expenses in this study were self funded and the author received no compensation for this study.
